Thursday 29 September 2016

Enjoy the Journey - Cathy Cafun

Hi Everyone!!
It's Cathy here sharing a masculine grunge layout created with gorgeous chipboard, a stencil and mediums from The Dusty Attic.  


"Enjoy The Journey"


To create my background, I have mixed the Dusty in Colour - Gingernut with gel medium to create a coloured texture paste.  I then masked my patterned paper with the Distressed Diamonds stencil using the gingernut texture paste.  Once dry, I randomly stamped over the background, then used the Dusty in Colour - Clear Gloss Varnish to randomly apply some copper Mica Flakes to give my background an aged look.

How fabulous are the Barb Wire Frames chipboard... omg just perfect for masculine layouts!!  You get 4 frames of various sizes in this set, and I have used the 2nd and 3rd largest on my layout.

To give chipboard frames an aged grungy feel, I altered them, by first coating with Dusty in Colour - Hot Chocolate, then whilst the paint was still wet I randomly sprinkled with Stampendous Aged Copper embossing powder and heat set.

For added dimension to the Barb Wire Frames, I have used one of the cogs from Cog Cluster chipboard, which I cut into 2 pieces and painted with Dusty in Colour - Faded Denim.  Once dry, I coated with the Dusty in Colour Clear Gloss Varnish and whilst wet sprinkled with blue Glitter Glass.  To tie in with the vintage feel I have altered the chipboard cogs with some Tim Holtz and Prima Mechanicals brads.   I used the same process on the Blueprint JOURNEY chipboard word.


Here are all the Dusty Attic goodies I have used to create my layout all available from The Dusty Attic On-Line Store.


Cathy Cafun

Wednesday 28 September 2016

Dreamy - Lisa Gregory

Hello Dusty Attic Lovers. I have a layout to share that is full of texture and soft dreamy color. I started my 12x12 layout by adhering a 12x12 piece of  Prima patterned paper on a piece of 12x12 corrugated cardboard. I adhered torn pieces of fabric, canvas, lace and texture paste and the Crosshatch Stencil to the background. The weight of whatever I place on my layout will not warp my paper. Once all of my background elements were adhered onto the paper, I prepared all of my chipboard pieces with white gesso. Once all of my elements were adhered to the background, the entire layout was covered with a heavy coat of white gesso. This created a clean blank canvas to work color magic.


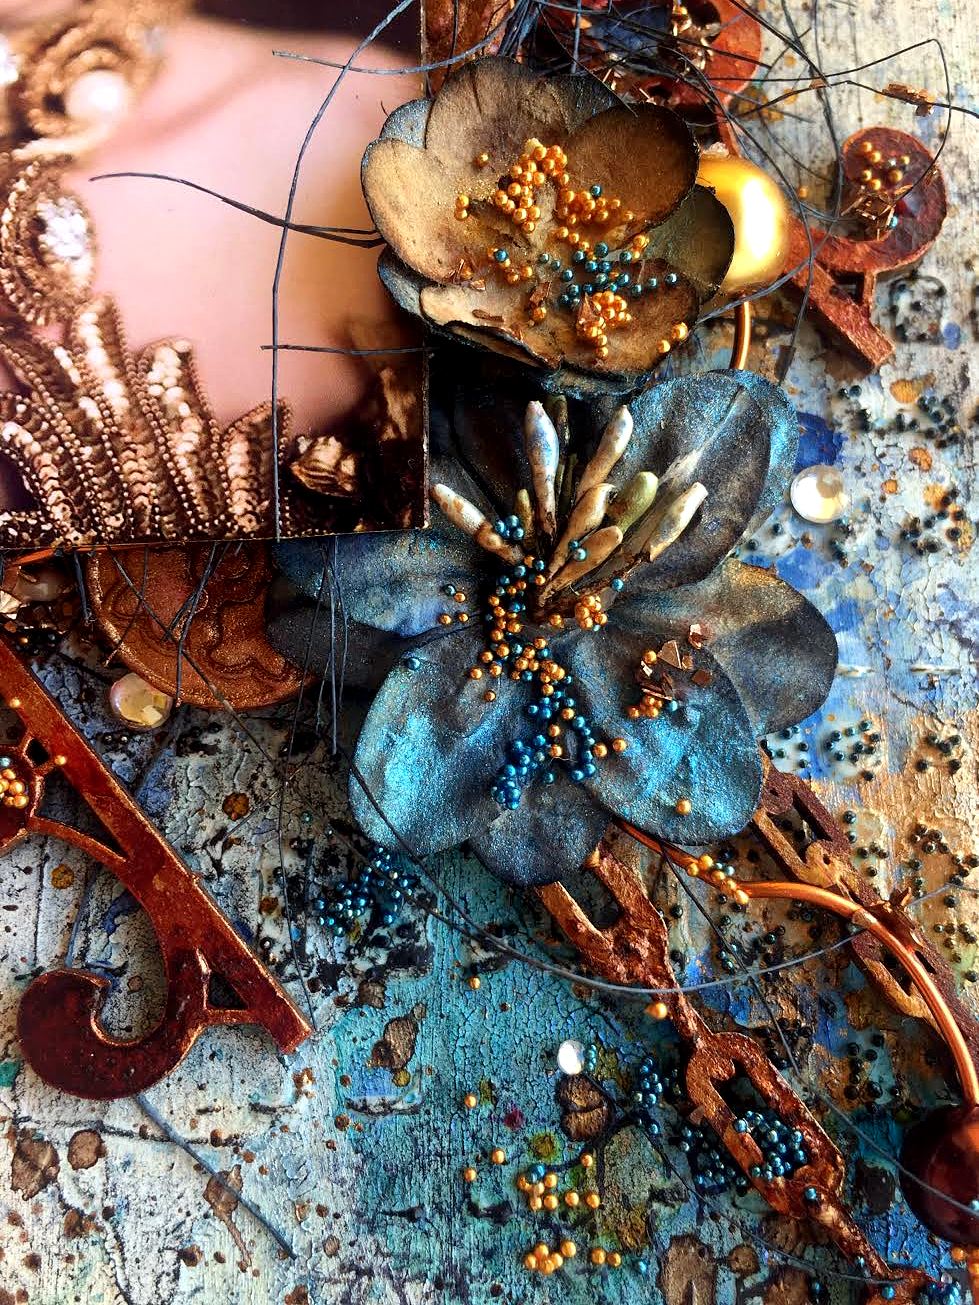
I created a wreath using a piece from the Circle Frame Set at the base, then layered the Vine Frame #2 on top. After the layout was completed, I added the Dusty Attic Pearls on random parts of the frame.


I used a combination of Color Blast Colour Paste, Lindys Stamp Gang Starburst Sprays and Prima Alchemy Paints to add color to my layout. I also added Prima Art Stones large and small using Prima 3D gel. When they were dried, a brushed them with white gesso, then color. A Botanic Accent #1 was used at the bottom of the floral. cluster to create a pleasing flow of accents. Pearls were added to it as well. For a watercolor effect, spray your surface with a fine mist of water, then spray or paint  your colors on immediately and tilt your project to make the colors run.


I absolutely LOVE the Brick Wall Panel. Of course I used the inner parts. I cut some of them into different lengths and staggered them. Yes even bricks can be glamorized with sparkly color.


I used the larger piece in the Ornate Corners #13 set.


I layered 2 pieces of Prima paper to create the mat for my photo, distressing the edges. Underneath, I lifted the mat with a couple of pieces of cardboard.


I adhered Prima Art Pebbles on top of the Bubbles chipboard. Using the inner parts of the chipboard to create my dimensional bubbles effects.


Thank you for joining me this week at Dusty Attic. I thoroughly enjoy looking for new ways to glamorize Dusty Attic chipboard. Head on over to the store and see the new products that are out. You will want everything you see!! Did you know Dusty Attic has stencils???  oh yea....More ways to add texture to your projects!! Till next time...


Friday 16 September 2016

Precious Memories - Patrica Basson

Can one believe it? Spring has sprung here in South Africa! Wasn't it just yesterday that we felt the cold fingers of Winter creeping up on us? We did not have a very cold Winter at all this year, no frost...and the forecast is that we are in for another hot and dry Summer again...Uhg...heat...really wish Winter could stay a little longer!

Anyways...Here I am once again with my Design Team page for Dusty Attic....Thank goodness Michelle takes selfies, That gives me a photo now and then to scrap...lol!


I used some Dusty Attic Clear Crackle Varnish on the top and bottom of the page. Also mixed Dusty Attic Texture Paste with Lindy's Stampgang Magical's, Steel Shimmer and stencilled that on the background. I then sprayed with Lindys Moonshadow, Ethereal Emerald. The Laurel Sprigs and Lace Border #3 are Gesso'd and painted with Indian Copper H2O's.


The Ornate Frame #7  was gesso'd and painted with Dusty Attic paints Hot Chocolate and Storm Cloud  and also sprayed with the Lindy's mist.

From the Dusty Attic On-line store I used the following products....


Hot Chocolate
Storm Cloud
Clear Crackle Varnich


For much more amazing inspiration, please visit our Dusty Attic blog filled with projects from my fellow DT friends...

Memory is a child walking along a seashore.
 You never can tell 
what small pebble it will pick up
 and store away among its treasured things. 
~Pierce Harris, Atlanta Journal~

Thank you for taking the time to visit....

Tuesday 13 September 2016

Art Journal Page - Valia Katzaki - Mood Board Inspiration

Hello Dusty Attic friends!

It's Valia Katzaki here with you today to show you another art journal page using glorious Dusty chippies and flowers. I am in love with my art journal lately and Dusty pieces always help my inspiration to flourish. This is an 17cm x 23cm page from my watercolor journal inspired by our October moodboard. 


Our moodboard 


The Lacey trims were painted with Finnabair steampunk copper and then misted with two shades of Lindy's mists. Because of the acrylic underneath, the mists didnt cover completely the chipboard, resulting in a beautiful stained, marbled look I ended up loving! 


I used Dusty Attic modeling paste to give texture to my background. I applied a thick layer of acrylic paint on my chains and then heat dryed it closely to make the paint bubble for extra texture. I also glued several Dusty blings. 


The Dusty Attic blooms were colored with mist made from Finnabair micas and Lindy's mist - what can I say? I am a like girl who loves shine! 


Dusty Attic products used

Image 1


Image 1


Image 1


Image 1


Image 1


Join in the fun and you may win 100$ store credit!!! 

I hope I inspired you with my art project! Until next time, 

xoxo