Wednesday 30 July 2014

Birthday Give-away winners .....

A MASSIVE THANKYOU to everyone that left us a Birthday Message
Thankyou also for your support
 for the last five years
 
Don't forget we have new designs
coming out all the time
hop on over to the web site to see our "Pocket Page" (Project life) chippy along with other new designs to inspire!
We also have a sketch challenge right here on the Blog every month where you
can also win a Prize pack
 
 
The winner of the Birthday Bonza
 Give-away is .....
NO- NOT JUST ONE WINNER
The FIVE winners are
 
Seadragon
 
Amy - Heart Creates
 
Karen C - Just another Day
 
Langeatheart
 
and
 
Robin Garrett
 
 
Could you lovely ladies email us your full
 names and address to 


So we can post out your packs to you.
 
Thank you again ladies
 

Tuesday 29 July 2014

#Happiness - Vicky Alberto

Hi, Vicky blogging today. Each month we have a fantastic Dusty Attic sketch challenge and the winner gets a great chipboard package prize - so please link your entry on the right side of the blog!

This month I decided to pull out some old papers from my stash (G45 and Basic Grey) to complement the lovely sketch. These floral papers were perfect to be embellished with the newest birds on a branch, mini gates and hashtag saying chipboard pieces.

Let's start with the beautiful sketch - so inspirational!

I cut the chipboard branch in two and placed the pieces at the top of my page. The branch was finished using Dusty Attic paints (alabaster, forrest, pesto, crushed olive, soot,  hot chocolate). The birds were primed with gesso, inked with pink for the bellies and finished with snow-tex for their backs and tails.

The gates were simply randomly splattered with gesso - that's it! The title was primed with gesso and topped with snow-tex. I also added a few Dusty Attic celestial white blooms and some smaller Petaloo flowers (around the gates and in the branch).

Thanks for joining me on the blog today and don't forget to link your interpretation of the monthly sketch on the right side of the Dusty Attic Blog!

Dusty Attic products used:


Sunday 27 July 2014

BIG BONZA BIRTHDAY GIVEAWAY

Pssttt UPDATE - The "boss" just told me there is going to be MORE than ONE winner !!!

Happy Birthday to you
Happy Birthday Dear
Dusty Attic....
Happy Birthday to US !!
Thats right Dusty Attic is 
FIVE years old
So to celebrate we are having a BONZA BIRTHDAY 
GIVEAWAY
All you need to do is leave us 
a birthday message in 
the comments on this blog
 post and our face book 
page to win 
Facebook page is HERE
(Comments are moderated so they wont show up straight away - but they will later)
so GOOD LUCK xox

Friday 25 July 2014

DREAM - Canvas - Rachelle Sigurdson

Hello,here is a canvas I did using some of Dusty Attics Amazing chipboard pieces....

The Dusty Attic Used:
Dream Catcher #2
Dream Catcher #2 (DA0746)
Chains 4pc
chains 4 pc (DA0312)
Lace Border #1
lace border #1 (DA0843)
Baroque Frame set - Circle
Baroque Frame Set-Circle (DA0542)
Leafy Flourish
Leafy Flourish (DA0759)
Flourish Frame Set
Flourish Frame Set (DA1035)
Fish Net Panel
fish net panel (DA0654)
Flutterbies #3
Flutterbies #3 (DA0766)
mini Heart Border
mini heart boarder (DA1015)
Wings Large (DA0850)

Teeny Tiny ABC set
teeny tiny ABC (DA0983)
mini Script ABC set
mini script ABC (DA0859)
I used the Vintage Summer Basics Collection from Maja Design:1912,1915,&1891
Here are some closeups of detail....
I did some distressed hand stitched layers & some stencil work using The Crafter Workshop Art is & Viva Modelling cream....
I stained all the chipboard with TH distress stain (tea dye & Vintage photo),then applied a coat of rock candy crackle.Once that dried I dried brushed on some white paint,& rubbed it in using my fingers. I used picket fence crackle on the feathers & chestnut liquid pearls on the dangling part of the dream catcher.


Now for the fun part,embellishing the dream catcher. I did some stencil work behind it,wrapped some prima wire thread around the circle part. I then finished embellishing it using,seed beads,beads,bottle cap,jump rings & flower clusters. I love both of the DA dream catchers,so much fun to work with....


Other products used,metal prima,metal heart with wings websters,flowers prima & petaloo.

Thank you so much for taking the time to look....Rachelle
;

Tuesday 22 July 2014

Jasri Bali - JULY Sketch - Heather McMahon

Hi there,

I've just returned from a wonderful holiday in Bali. I'd really like to thank all my followers who kept on commenting on my blog posts even though I often didn't have internet access and couldn't return the favour. I'm honoured you kept the one-way communications alive!

Anyway, I'm back in the connected world now and thought I'd create a front page for my album about our trip. Yes, I went away for 10 days and took over 800 photos! I'm going to need a whole album!

My layout is based on the July sketch at Dusty Attic. Here's the sketch:
 
REMEBER YOU CAN JUST ENTER ON THE TOP
 RIGHT BY ADDING YOUR LINK
 (Yep, its that easy)


And here's my layout:


I've used lots of new Dusty Attic Goodies and plenty of stamping on this. For the title, I cut the 2014 from another title and coated it in Dusty in Colour Jungle Green paint. I coated the Bookman letters in Cranberry paint and the topped them both with a haphazard coat of Gold Nugget Tinby Metallic Melts. The effect this creates reminds me of the old rustic Balinese furniture that you sometimes see.

Here's a close up:


I made the flowers from Dusty Attic's Flower Layers #6. To get that motley effect I first spray painted them with white paint then stamped them Stampin' Up! water-based inks. These inks don't soak into the paint and they show all the texture. The downside is that they re-activate whenever a wet medium touches them so they can be messy to use. I took advantage of this by applying white paint in the centre of the flowers to create that streaky look. I rummaged around the bottom of my flower drawers and found a few flower centres to add to the chippie flowers.
For the smaller flowers, I simply painted them with Alabaster paint then added a light coat of Jungle Green to the centres.


Just as I was making this layout, some brand spanking new chippies arrived and I immediately added them to the page. For both the Page Pebble and the letters I simply stamped them with white ink. This left the recessed pattern as raw chipboard. I love this effect!


All the stamps are from Kaisercraft with the exception of the two smaller butterflies which are Tim Holtz stamps.

Here are the Dusty Attic products I used:
Flower Layers # 6 DA1078

Bookman ABC Set DA0666


2014 Year In Review DA1092

mini Blossoms DA 1090

Page Pebbles #8 DA 1113

mini ABC Tile Set DA1109

Thanks for looking. I can't wait to get stuck into the rest of my holiday pics now!

Happy scrappin'!

Heather


Thursday 17 July 2014

Not 1 not 2 not 3 BUT 4 Projects from Gabrielle Pollacco (WITH TUTORIALS)

Hello Dusty Attic Fans!  Gabrielle here with you today to share a bunch of projects I've made over the past few weeks using some NEW and some old favourite chipboard pieces!  I absolutely LOVE the new scripted chipboard titles Word Pack #4.  I just adore a pretty scripted title!  I also used the Cyclone Wire as an accent piece around the photo and the top of the page.


I used some shimmery paint (Shimmerz Key Lime) fading in and out of the title piece. I gave the whole title a finishing coat with some Glossy Accents.


A close up of the Cyclone wire accent


Another close-up of the title chippie...


The next project I'm sharing is Mermaid canvas I made using the NEW Sea Grass chippie, I just love the pretty flowing underwater look it gives a project!   I also used some Grass Clusters #2 and some Dusty Attic alphabet pieces for my title.


Here's a close-up of the Sea Grass chippie, ....I painted white and then added some Key Lime Shimmerz paint and Olive Green Shimmerz on the tips.  You can watch a Video Tutorial I made for this canvas here...


~~~~~~~~~~~~~~~~~~~~~~~


I made another Video Tutorial for an 8x10 Canvas using the Dusty Attic Divine Divas chippie and Ornate Frame #3 as the center piece of the design.  I also used a couple of the Baroque Corners and Elegant Frames for the title.


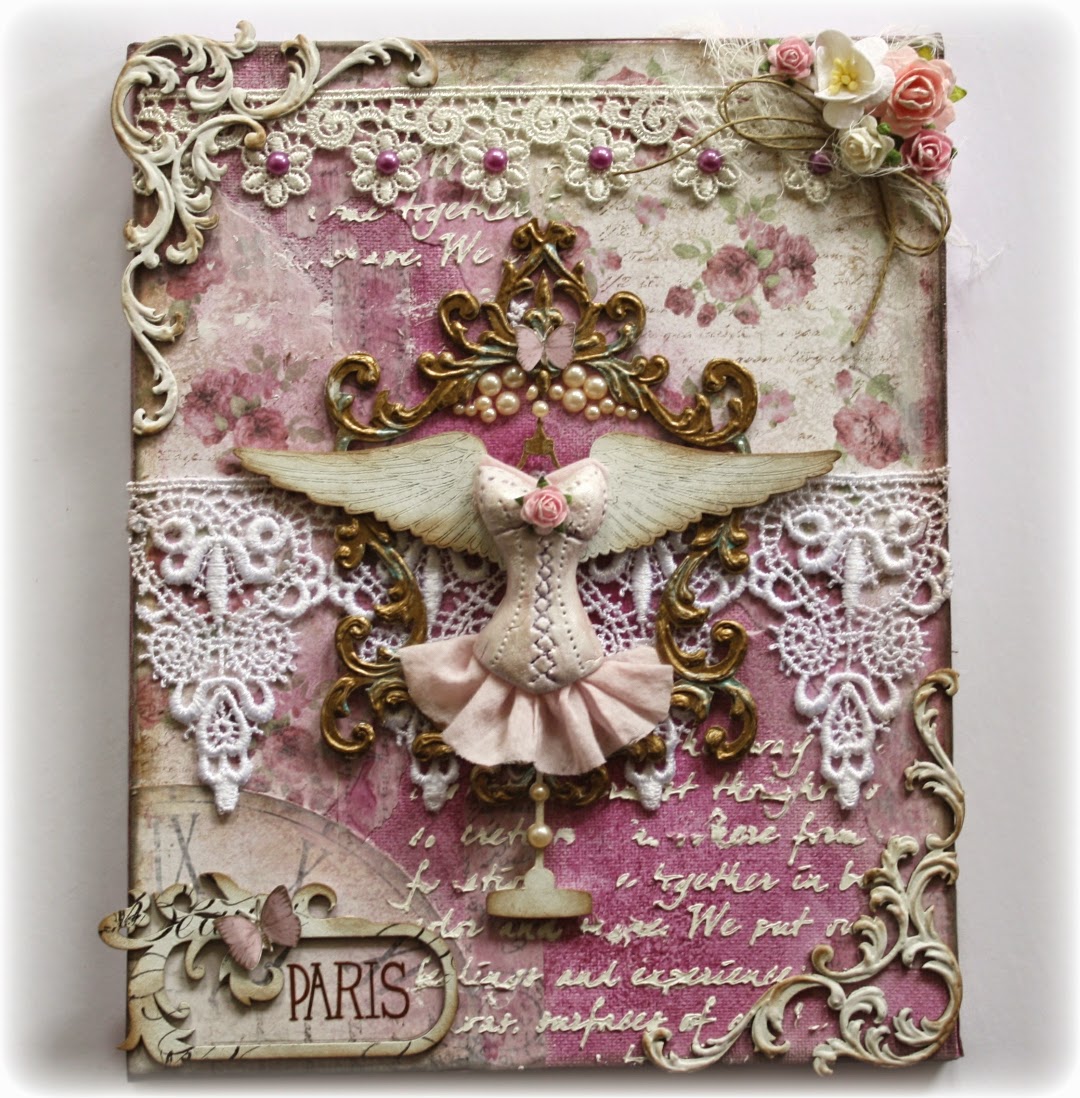
I used dimensional paint to create a textural finish to the frame and then used Shimmerz Inklingz (Brass Knuckles) and Dimensionz (Blue Lagoon) to give it a vintage brass look.


A close up view of the centerpiece...


I used a similar technique on the Baroque corners, using dimensional paints, Gesso and brown ink to make textural shabby chic embellishments for the corners.  Here is a Video Tutorial I made to show step by step how I made this canvas....


~~~~~~~~~~~~~~~~~~~~~~~~~~~


Can you tell I've been having fun with canvas's this month?  This was a fun, quick and easy canvas to make!  I used some beautiful Graphic 45 paper and stamps and some of my favourite Dusty Attic chippies.  


Corner Scroll #2 is one of my all time favourite scrolls!  It works so well with so many styles. I gave the chippies a coat of Gesso, did a little stamping and inking with brown chalk ink and then gave it a coat of Crackle medium to get a nice aged look.


I used the Dusty Attic Anchors chippie to accent the corner, I just rubbed on some Bronze 3D paint and randomly added some aqua color paint on some areas to give it an aged patina.  And here is a video tutorial I made for this reverse canvas project...


~~~~~~~~~~~~~~~~~~~~~~~~~~~~~~~~~~

One more project I wanted to share with you all is a layout I made as a guest designer for Graphic 45.  I used the beautiful Botanical Tea collection papers and some of their lovely metal accents to make up this page.  I loved the pretty little pink blossoms that I could fussy cut from the patterned papers.  I married these with the amazing Dusty Attic Branch #1.


I simply painted the branch with Dusty Attic's Hot Chocolate paint and tipped the leaves with DA's  Pesto green paint....stuck on the fussy cut blooms, and voila, you have a unique embellishment for your project!

I hope you all enjoyed my project for this month and thank you all for having the patience to scroll through this super long post! :)  As you can tell, no matter what project I make up....Dusty Attic chippies are never far from my finger tips!