Friday 20 September 2013

GLOW Canvas - Rachelle Sigurdson


Hello,here is a canvas I made using some of Dusty Attics amazing chipboard pieces...
These are the pieces I used on the canvas....
Flutterbies 3 pack DA0389
Grass Cluster DA0660
Heart Flourish DA0275
Bookman ABC DA0666
 
 
I started this canvas by doing some stencil work using molding paste. I used the 12 x 12 Butterfly Meadow & 12 x 12 Confetti Doodling Template from TCW. Once that dried, I tried my best at getting the colors of the background in the photo. I layered & layered so much LuminArt",Tattered Angels or whatever I had that looked like it would be the right color, that I finally had to quit. I don't even remember what I used (LOL). On the Dusty Attic Chipboard, I worked with the colors in Jacobi's dress.On the heart flourish I used Bolivian Blue & Razzleberry LuminArte', I also applied crackle over the Razzleberry. I also used the same on the butterfly & alpha, but on the alpha I used some gold perfect pearls. Here are some closups of detail.....

On the grass cluster I used Olive Vine LuminArt', then rubbed in some Viva Gold Metallic Rub on to the stem & the grass part. On the head of the grass I first applied gold perfect pearls,then once that dried I glued on some gold micro beads.....


Thank you so much for taking the time to look.....Rachelle


Tuesday 17 September 2013

Cherish - Guest Designer - Sue Smyth (with another tutorial)

Cherish the memories Layout 
by Sue Smyth 

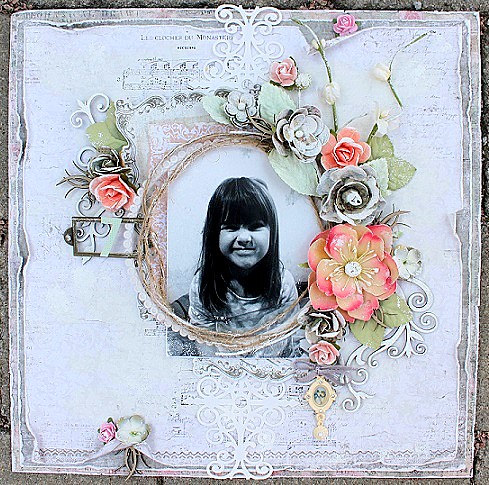
Here is a Dusty layout of my daughter, this is my favourite photo of her, I took it many years ago when she was about five, I love rose in her hat, and have used the colours in the hat for my layout.

I have started with a base of texture paste and added two chippie branches and a stencil, once dry, coat the lot with gesso to form a great base for Glimmer mist sprays 


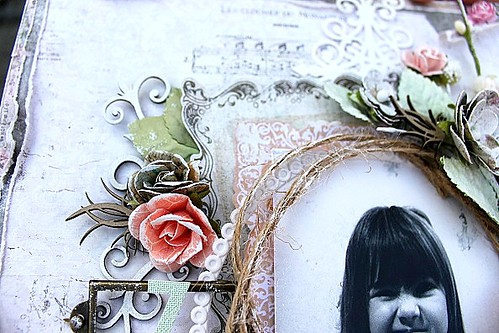
To create the mottled effect on the vine flourish, first paint it with gesso, when dry dab with crushed olive and peeled paint Distress stains.  Allow to dry and cover with dimensional magic. The trick is to swirl around the dimensional magic and scrape the distress stain with the tip of the nozzle.  So when it dries you have this swirled effect.

Dusty flowers are sprayed with glimmer mist, then a small amount of spray adhesive, sprinkle a little white glitter and you have jazzed up your flowers.


The fern leaves I have just barely swiped with gesso and used them as is, this is a great contrast to the heavily altered chip. 

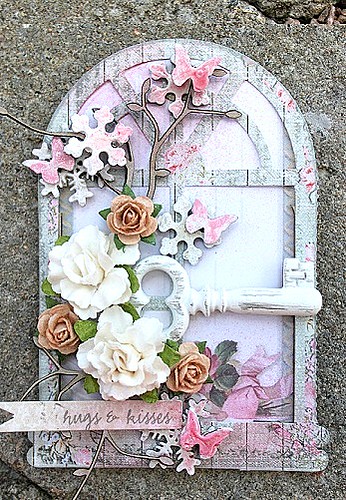
The little bird houses are simply painted with gesso, coloured with Copic makers and covered in Dimensional Magic. The little mushrooms are painted with gesso, red ink is applied to the tops, and I have used a white paint pen to mark out the spots, cover with dimensional magic to seal. 

To make the faux opal, fill a trinket finding with black enamel accents, carefully place chips of glitter and mica shards into the enamel accents. Allow to dry, and cover with Dimensional magic. I love this effect and use it all the time with different colours and glitter glues.

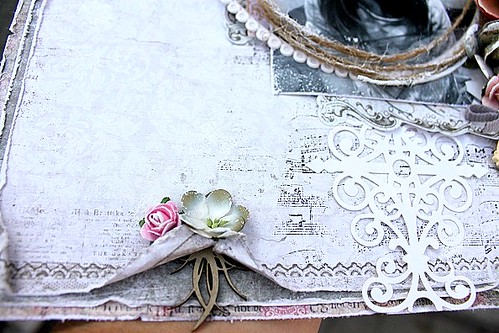
Enjoy some close ups 


Dusty Attic Products used 
Corner Scroll #4Branch #1Branch #2VIne Corner #2mini Butterflies #2Flutterbies #3Window with Shutters large

Toadstools


Hope you are inspired and Happy Crafting 
Sue Smyth

Monday 16 September 2013

EXCITING NEWS - A New DT Member .........

Hello everyone 
we have some exciting news with the addition to our 
Design Team of
 (Insert Drum roll here.......)  

RACHELLE SIGURDSON 


Rachelle's work is just amazing with a unique style.
Her attention to little details is just gorgeous and the longer you 
 look at her layouts - the more you see. 

Rachelle has done our sketch of the month 
(by Michelle Grant - which you can enter here as well)  

September2013SketchbyMichelleGrant.jpg (750×750)

and Rachelle's take on the sketch .....  


Garden Frame set DA0606
Garden Frame Set

ATC  Frame #1   DA06073
ATC Frame #1 - Click Image to Close

Bookman Alphabet set  DA0666 
Bookman ABC Set


You can see more of Rachelle's work on her blog 


Dont forget to enter our huge giveaway as well 


 FACEBOOK competition 


Thanks for stopping on the Blog today 

Sunday 15 September 2013

Birthday Morning - Helena

This photo is of my dd on her 7th birthday earlier this year, taken in the
morning when we woke her up, singing "Happy Birthday to you"
 and giving her presents. I just love the look on her face!

When I made this page I discovered I was out of Dusty Attic scrolls and vines!
Such horror! I desperately needed some scrolls for this page, so I looked deeper
 into my Dusty Attic box and thankfully I found a Corner Flourish #5 (DA0875)
that I divided into smaller parts and painted white. This corner chippie saved
my day - and my layout!

Seven

I have tucked little Grass Clusters (DA0866) into my flower cluster.
 I have also used Dusty Roses (DA0953) and Dusty in Bloom leaves.

Here are some close-ups for you:

Seven detalj4

Seven detalj3

Seven detalj2

The beautiful papers are from Maja Design, Vintage Summer Basics.

Thank you for stopping by today, I hope you found some inspiration!

Saturday 14 September 2013

Hugs and Kisses Shabby Chic ATC - Helena

Hugs and kisses ATC

This months ATC theme - Shabby Chic - was so much fun
working with! This is so me :)

Lots of white and pink, lots of Dusty Attic chipboard (perfect for Shabby Chic themes!)
and lots of Dusty Roses - this is the kind of creating I really love.

I have used Snowflakes, Mini Butterflies and small pieces of Branch #2.
The snowflakes and butterflies I painted with Dusty in Color, Alabaster.
The butterflies also got touched with Dusty Pink. Then I covered the
painted chippies with Clear Gloss Varnish.
 The smaller roses are Dusty Roses, color Caramel.

Thanks for stopping by today!
Don't forget the awesome give -a - way as well
This month brings an awesome competition over at
our Facebook page  (HERE)  


Look at all that chippy - Paint - Gloss - Crackle
and the Paint Caddy 

Go on over and join in to win !!!

A Farewell - Mistra

 
Due to Family commitments and Working etc
Mistra has had to step down from the Design Team
 
Mistra has been with Duty Attic from nearly the beginning and not only has
been on the DT with her beautiful work but has previously been behind
the scenes as DT Co-Ordinator and Admin.
 
Thank you Mistra for your time and expertise you have dedicated.
 
You can always see Mistra's work on her blog HERE  and
of corse at the Dusty Attic Ning  HERE
 
Love Jennifer and the Dustettes  
 

Friday 13 September 2013

A Simple Walk - Geraldine (plus a paper weaving tutorial)

 
 Hi there everyone! 
 It's my turn today, Geraldine' here to share with you my layout....
'a simple walk' 
using Dusty Attic chipboard, Dusty Blooms and Dusty Roses.  
This is a layout of my Daughter Mackenna and son Tarquinn.
I love this picture because normally it's so hard to get them together
 and thanks to a persistent photographer who said
 'it's just a simple walk to the waters edge'.......they had no choice!


Dusty Attic Products:


Flower Layers #4 large

Other: Tim Holtz Crackle paint, 7 gypsies Tissue paper, Prima paper and stitch stamp.


**Background Paper weaving Tutorial**

You need - 2 pieces of paper - preferably the same, 1 piece of cardstock and Edge Distresser.

You can either weave paper straight or on an angle and any thickness that you choose -here I have chosen 2inch thick strips and angled.
I like to have a piece of cardstock as base so that I don't lose my 12x12 square.
You cut one sheet of paper- (sheet A) from Right top to Left bottom and the other (sheet B) in reverse- Left top to Right Bottom.
**Distress each edge if you want a prominent and obvious weave.**
Start by taping (A) top corner strip down and then place (B) opposite strip on top of this corner.
You then continue to alternate between the two sheets weaving and overlapping each strip until both sheets are together to form one 12x12 page.
It's time consuming but well worth the effect!
Till next time. enjoy the blog!.....G.


Wednesday 11 September 2013

Trinket Box - Gabrielle


Hi everyone!  It's me, Gabrielle here with you today sharing another 'off the page' project with you using Dusty Attic chipboard, Dusty Blooms and Dusty in Color paints.  I've had these cute little 3D Birdhouse chippies in my stash for some time now and have finally had an opportunity to use them!  If you are like me, you always need lots of trinket boxes to house your scrapping stash and photos.  Personally, I think if you are going to have boxes sitting around you may as well make them look pretty right? 

These little birdhouses where so easy to put together I just traced out the pieces on some pretty patterned paper (I used Maja Design papers from the Sofiero collection, and some from the Vintage Spring Basics colleciton).  Once I had my patterned papers glued to the panels and just glued each of the houses together.  Then the fun stuff started....dressing up the little houses with tiny picket fences, grasses, scrolls, key holes, branches, birdies, topiaries, vines, bricks and blooms. 

And since it's a box, you dont't want to forget the back since it can be seen from all angles!  Here I used the 'Elegant Flourish Small' chippie and a cameo to pretty up the back of the box.  I also added extra blooms, grasses and picket fences to the backs of the houses.  Here are the Dusty Attic supplies I used to make this page: 
Dusty Attic Supplies:
~ 3D Birdhouse Set 3pkg
~ Baroque Corners
~ Brick Wall Panel
~ De Vine Frame Set
~ Elegant Flourish Small
~ Mini Birds #1
~ Mini Picket Fence
~ Mini Branches
~ Mini Grasses #3
~ Decorative Keyholes #8
~ Topiary Trees #1
~ Dusty in Bloom Vintage Rose
~ Dusty Roses, Latte, Caramel
~ Dusty in Color, Sage, Hot Chocolate

I hope you enjoyed my project as much as I enjoyed making it! xo