Thursday 29 August 2013

Tissue Box Cover - Vicky Alberto

My daughter has been begging me to make something for her room, so here is it... 
I used my Swirlydoos August kit leftover papers and trims and altered a tissue
 box with plenty of beautiful Dusty Attic pieces. I used an entire set of Baroque
 Corners (DA0543 -- 6 in a set, 2 large and 4 small) plus a gorgeous frame from
the ATC set #1 (DA0691 -- 3 different styles in a set) that fit perfectly over the hole.

Here is the full view from the front. The pearl and lace flower tutorial can be
 found HERE on my blog.

Here is the top view. All of the chipboard pieces were stippled with gesso and
splattered with pink Silks glaze. An easy shabby look to achieve.

Here is the back view and a close-up of the splattered glaze on the chipboard.

Thanks for stopping by the blog today!
Vicky Alberto


Tuesday 27 August 2013

Laugh Layout - and card by Olga

Layout about my lovely daughter:
- Good morning, my sweet girl!
- Good morning, my sweet mom!

Details: 


I used:
Polaroid Frames
Star Frames
Stars #1
Word Pack #2
Dusty in Colour

And I also made this card
 
I have used
Dusty in Colour
Dusty in Bloom
mini Butterflies #2
mini Grass Clusters #2
 
Thanks for joining me on the blog today
 
Olga


Monday 26 August 2013

Medieval ATC - Vicky Alberto

This month's Dusty Attic ATC theme is "medieval" and I created mine to sit nicely
 in the middle of a card. I used my left overs from my August Swirlydoos kit and
added lots of gorgeous chipboard pieces. The background is actually the inside
 negative from an ATC frame #4 (DA0896), the lion head is from the Coat of Arms
set #2 (DA0833), and the four corner pieces on the card are from
the Moroccan Accents (DA0837).


Here is the ATC on its own. Once primed with gesso, I used a variety of metallic
 distress stains, crackle paint and inks to finish the chipboard pieces.
I topped them all off with a little "royal" manly bling.
 
Thanks for joining me on the blog today
 
Vicky 


Sunday 25 August 2013

Thinking of You card - with guilding tutorial - Louise Collins

Occasionally we all have events in life that we need to mark, even if they are not the happiest. Unfortunately I needed to create a card for a friend who has lost a loved one recently, and it would have been his birthday soon.
It is always difficult to know where to start, but when I saw these Mini Ornate Gates from Dusty Attic, I knew they would be perfect.
 
 
To get the worn, peeled gold paint effect, I used black paint first as a base. I applied mine with a paint dabber, as thickly as possible.

 
Before the paint dried, I sprinkled on some gold gilding flakes. These are very thin, and will get everywhere so you need to try to contain them! I worked in the bottom of a pizza box.
 
Press the loose flakes into the wet paint and wait a few minutes for it to dry. This does not take long at all which is why I needed to work quickly.

 
Once dry, use a stiff brush to brush away any loose pieces, and get into all the small details and gaps.
You will be left with a partly gilded chippy which can then be sealed with a matt sealer such as Mod Podge.

 
I decorated mine with leave, flowers and a metal charm to finish.


 Thanks for joining me on the blog today
 
Louise


Friday 23 August 2013

Remember - with a Brick wall tutorial - Vicki Alberto

Here is a layout I made using some fabulous Dusty Attic "brick wall" pieces (DA0316) and a mini word "remember" (DA0386) for the title. I used some awesome Dusty in Colour acrylic paints too! See details in a tutorial below. BTW - the young boy in the photo is my dad with his dad (on the left) and two uncles. I used my leftovers from my Swirlydoos July kit to create this layout.


On the title word, I primed it with gesso and then topped it with "snow writer" paste (by Art Deco). The stamping? I used bubble wrap - so easy to do!

BRICK TUTORIAL

STEP 1 - I started off by painting with sunburnt orange (DA0906) and bisque (DA0921) paint - trying to avoid the casing so they wouldn't get stuck in there. Then, I added some dark brown ink on top.

STEP 2 - I used the snow writer and randomly semeared it on - again trying to avoid the casing so they wouldn't get stuck in there.

STEP 3 - I went over all of it with light brown ink to blend the colours.

STEP 4 - I whitewashed it all with watered down gesso to give it a soft aged effect to suit my whitewashed project. NOTE: Omit this step if you are using on a darker layout.

STEP 5 - I added some of the bricks to my project and filled the spaces with the snow writer (easy to do since it has a really fine tip). Alternatively, you could slather on any paste of your choice and then set the bricks into it (but it's not a precise application that way). TIP: Use a toothpick to flatten in the groves a bit.

Thanks for taking the time to view my project today!


Saturday 17 August 2013

Friends - Mistra

Hi Everyone,
click on the image for a larger view
I loved these new beautiful Ornate Gate #2 Jen has designed, and when I got this lovely Pion paper it was the first piece I thought of to use with it.


I've given it a rough coat of gesso as a base and to add some slight texture, and while still wet sprayed it with some denim and charcoal coloured glimmer mists, dabbing the colour to blend with the gesso.


The Butterflies #3 and Mini ABC Set Lower were also treated to the same finish... and then touched with some glitter for a little sparkle.


I used some flowers I created for iMagineD creations, the colour was perfect for the
Pion papers, and then created a ruffle with some of the Pion offcuts.
You can pop on over to my blog here for more information 


Thursday 15 August 2013

A Lifetime is not long enough - Helena

The minute I saw the Dusty Attic title "A lifetime is not long enough to love you" I knew I wanted to use this piece for something special. For the first time I have scrapped a layout with photos of the loves of my life - my dh and my children.

Family

To alter the title chippie I used white gesso and Dusty in Color Sugar Raisin (DA0910), using a sponge. Then I covered it with Clear Gloss Varnish (DA0901).

Beneath all the beautiful flowers I have used the Leafy Stem #4 (DA0892). I painted this chippie with white gesso, Dusty in Color Raisin and Dusty Pink (DA0907). Then I glossed it with Clear Gloss Varnish. The Wagon Wheel (DA0697) was painted with white gesso and Dusty in Color Pesto (DA0918) and then Clear Gloss Varnish.

I have also used lots of amazing Dusty in Blooms on this page - Bridal Veil (DA0805), Vintage Rose (DA0803), Wild Moss (DA0804) and Dusty Roses Eggplant (DA0958). I gently touched the flowers with white gesso to get a softer feeling.

Prepare yourself for lots of close-ups!

Family detalj5

Beautiful flowers and the Wagon Wheel:

Family detalj4

Here you can see the Leafy Stem peek out:

Family detalj3

The title:

Family detalj2

Family detalj

Family detalj6

Family detalj7

The papers I used here are from Maja Design, a Swedish manufacturer. Gorgeous papers, just perfect for Dusty Attic chipboard!

Thanks for stopping by today!

xoxo
Helena

Wednesday 14 August 2013

Medieval ATC - Helena and Mistra

ATC august

This months ATC-theme - Medevial - was a bit of a challenge since I used colors I'm not used to. I love how this turned out though. I have played with lots of Dusty in Color products!

I started with an ATC Gothic Window (DA0795) that I painted with Soot (DA0925) and Vintage Gold (DA0926). When the paint had dried I covered the chippie with Clear Gloss Varnish (DA0901).

Then I picked out little pieces from the Coat of Arms add on # 1 and 2. The little castle I painted with five different Dusty in Color, using a sponge. Colors used: Alabaster (DA0902), Soot, Bisque (DA0921), Forrest (DA0919) and Sunburnt Orange (DA0906). The smallest pieces I painted with Alabaster, Soot and Vintage Gold. Finally I glossed all these chippies with Clear Gloss Varnish too. And then, just because I love the Varnish so much, I put some on the ATC background too, as an edge.


Hi everyone!

Here's my ATC for this month's Medieval theme at The Dusty Attic, I chose to create the family Coat of Arms, well as close as I could.  Jen had almost the exact pieces needed in her Coat of Arms chipboard designs. 


I've used lots of different embossing powders to create the finish on these, using mostly metallics to create a painted steel look.  


Afterwards I added touches of rust and patina embossing powder and then inked on some brown ink to age it all.


My hubby loved it... I'll have to make one now for the other side of the family!


Monday 12 August 2013

Mixed Media Canvas - With a TUTORIAL video - Gabbi

Hi Everyone!  It's me Gabrielle here with you today and I'm so excited to share with you a video on a new mixed media canvas I made using lots of my Dusty Attic Chipboard, some gorgeous Tresors De Luxe laces and lots of just odds and ends from around my house!  I will admit I do not have a lot of mists etc. in my stash so you will see that I used some mists mixed with simple acrylic paints and even a small mister filled with some steeped black tea (a tip from Finn) that I used to give the canvas a vintage look.  Here are some closer looks (Scroll down to view the video).
 
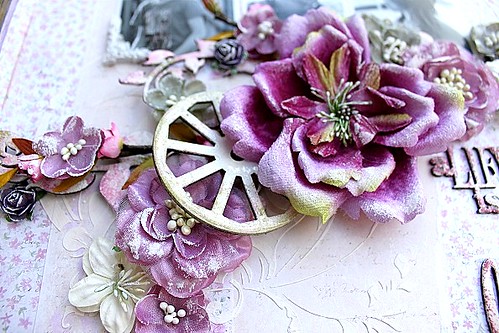
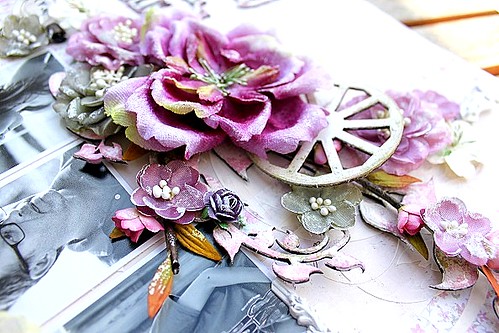
I made the bloom in the corner from some simple satin ribbon!  I will share another tutorial on this in the future.  It's also fun to used household things like bottle caps, loose beads, bits of brass from old jeans and of course little bits of  Dusty Attic chipboard.
 
 I used some stencils and texture paste to create more texture relief on the background of the canvas.  I find the busier you make the embellishments and texture, the better the finished design turns out.

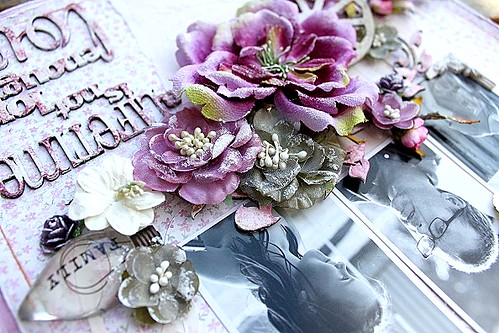
You can really use any color of embellishment when doing one of these style canvas's (blooms can be a color you  have in your stash that you never use!) because you end up covering it all with gesso.

Here I used one of my favorite Dusty Attic Scrolls (Scroll #1) and I layered cheesecloth underneath for extra texture.  I tried to show all the steps in the video without making it crazy long (it's about 20 minutes).....I edited out adding some of the embellies because I think you can only watch me for so long gluing on all the nic-nacs.  So grab yourself a cup of tea (or coffee) and relax and hopefully enjoy my little tutorial! :)

 
I hope you enjoyed my tutorial.  I hope this has inspired you to try a mixed media canvas, it's messy but a lot of fun!  Here is a look in a nutshell at all the fun Dusty Attic goodies I used for this canvas...
 
Dusty Attic: Chicken Wire Panel, Scroll Border #1, Cogs #1, Jumbo Cogs, Vintage Keys, Wrought Iron Trim Set, Scalloped Circles, Nuts & Bolts, Dusty In Color (Dusty Pink, Pesto, Hot Chocolate), Hinge (not shown in photo), Dusty Roses (Claret, Caramel).